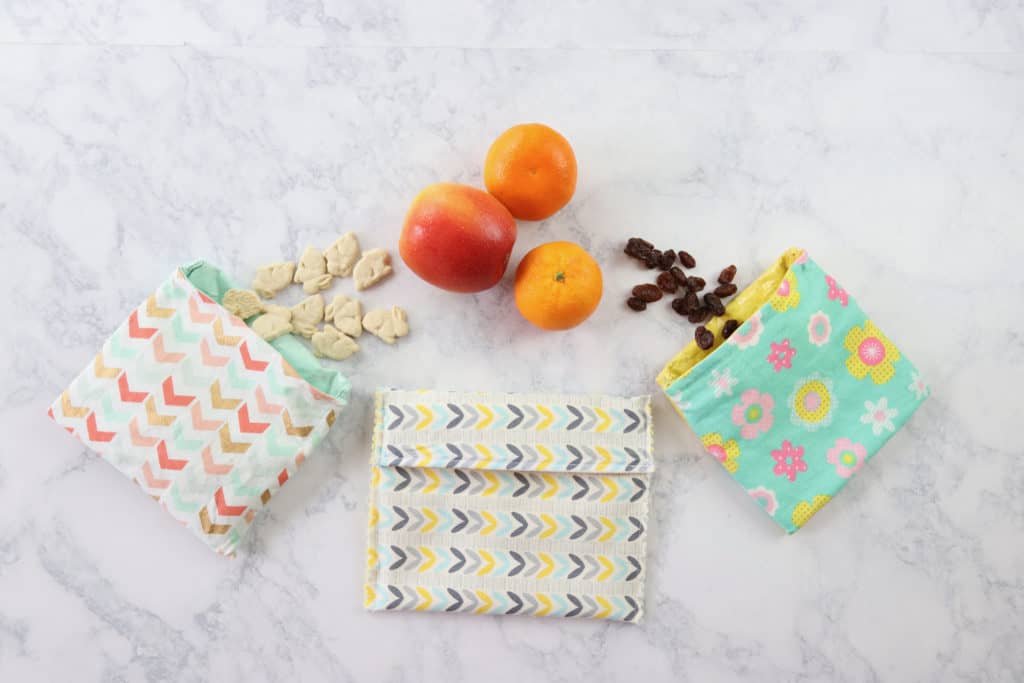
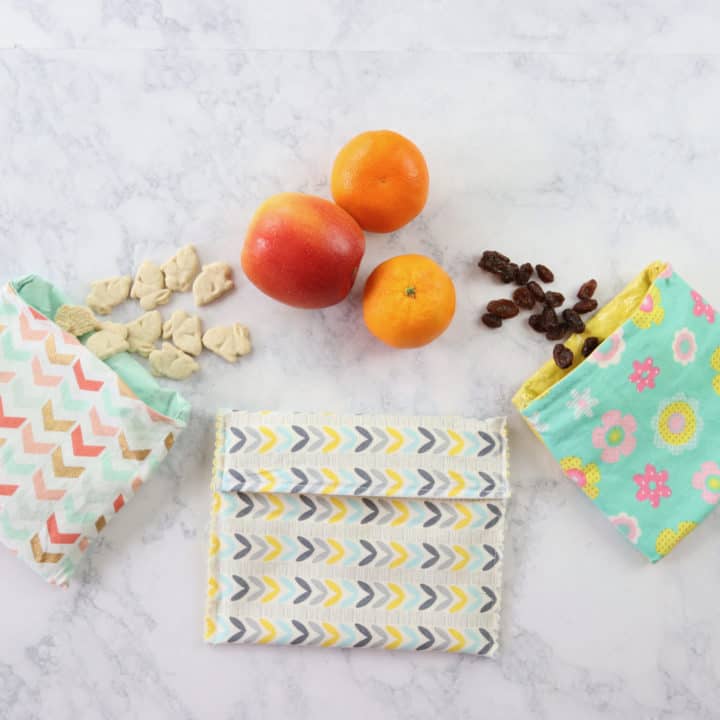
These DIY reusable sandwich bags are a wonderful project with great functionality. Slowly, I am working to eliminate how often I use single-use plastics in our home. These reusable sadnwich bags are very easy to make and are made with a wipeable lining and can even be thrown in the washer.
Thank you so much for stopping by! This post contains affiliate links, I receive a small amount of compensation if you choose to purchase from my links (for example – as an Amazon Associate I earn from qualifying purchases). I only link to products that I know and love.
Why Use Reusable Sandwich Bags?
Most plastics end up in landfills, oceans and our waterways. Plastics do not biodegrade, instead they slowly breakdown into smaller pieces and contaminate our soils, water and even make their way into the human food chain. Any amount of reducing our use of plastics is very beneficial to our environment and our health.
I am not perfect at this and I have a long ways to go. I still use plastics, but I am trying my best to move in the right direction and reduce and reuse as much as I can.
Are The DIY Snack Bags Washable?
Yes! The type of vinyl that I used is machine washable and it can also easily be wiped clean with a sponge and dish soap after use. I have found it easiest to spot clean the interior as needed, but if the outside gets dirty, I’ll have no issue tossing it in a cool wash cycle with mild detergent. Always lay flat to dry – no dryer!
What Can I Use My Bags For?
Anything you would like! They are so versatile! You can bring fruit on the go, sliced up apples, nuts, raisins, crackers and even sandwiches. You can also make these in whatever size suits your family, so feel free to double the size of these reusable snack bags and follow the tutorial just the same.
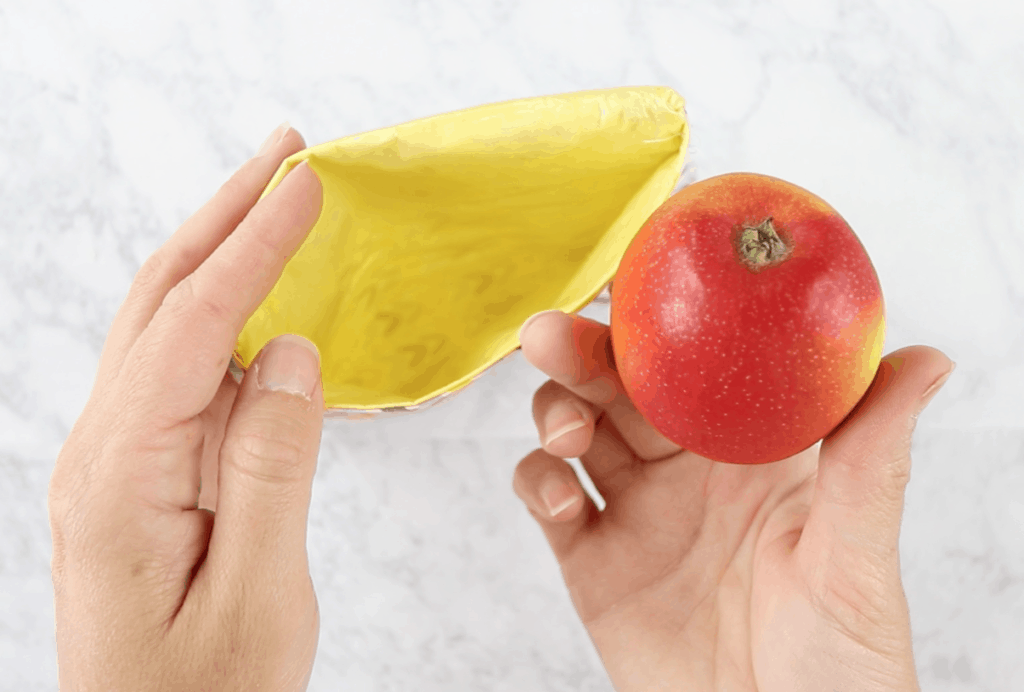
Is the Vinyl Food Safe?
Yes it is! It took me quite some time to find a vinyl that is food safe. Most vinyls are full of awful materials. I would like to find an even safer alternative to this vinyl for sandwich bags, so I will update this post when I find one. I considered using beeswax wraps, but I don’t think my sewing machine would sew through them easily. For now, this brand is working just fine and I’m happy with it. You could also just omit the vinyl all together and plan to wash your reusable sandwich bags more often instead of just wiping them out.
How To Make Reusable Sandwich Bags
Supplies/ Tools
- Cotton Fabric 13″ x 7″ x 2 pieces
- Food Safe Vinyl
- Scissors
- Pinking Shears
- Iron
- Sewing Machine
- Cut 2 pieces of cotton fabric 13″ x 7″ each
- Cut a piece of vinyl 13″ x 7″
- Apply vinyl by following directions and using your iron
- Place vinyl fabric vinyl side up on table and place the other piece of cotton, right side towards the vinyl.
- Sew down each short side with right sides facing in.
- Turn right sides out and sew along short edges again to finish off seams
- Next lay your rectangle on the table with the vinyl side facing up.
- Fold bottom to top, leaving about 2″ at the top to fold over the bottom part.
- Then sew straight down each side
- Lastly, use a pear of pinking shears to shear the edges so your fabric won’t fray
DIY Reusable Sandwich Bags | How to Make Reusable Sandwich and Snack Bags
These DIY reusable sandwich bags are a wonderful project with great functionality. Slowly, I am working to eliminate how often I use single-use plastics in our home. These reusable sandwich and snack bags are very easy to make and are made with a wipeable lining and can even be thrown in the washer.
Materials
- Cotton Fabric 13" x 7" x 2 pieces
- Food Safe Vinyl
- Scissors
- Pinking Shears
- Iron
- Sewing Machine
Instructions
- Cut 2 pieces of cotton fabric 13" x 7" each
- Cut a piece of vinyl 13" x 7"
- Apply vinyl by following directions and using your iron
- Place vinyl fabric vinyl side up on table and place the other piece of cotton, right side towards the vinyl.
- Sew down each short side with right sides facing in.
- Turn right sides out and sew along short edges again to finish off seams
- Next lay your rectangle on the table with the vinyl side facing up.
- Fold bottom to top, leaving about 2" at the top to fold over the bottom part.
- Then sew straight down each side
- Lastly, use a pear of pinking shears to shear the edges so your fabric won't fray
Love, love, love this! Anything to lessen our lives without using plastic. Thanks for sharing.
Yes! I’m loving finding creative ways to reduce our plastic use! You’re welcome!
These are so cute! What a great way to reduce waste and cost.
Thank you Liz!
I love this! They are so bright and fun!
I love this idea! And always trying to find ways to go paper and plastic free in my kitchen. Thank you for sharing.
Yes! Me too! You’re welcome 🙂
What an easy project to add sustainability to our kitchens! Thanks for sharing, Kristen!
Thank you Amy!
I love this! I’ve been wanting to make some so this is perfect!!
Thank you! I hope you try them!